Tips & Tricks for Optimizing Dashlane’s Autofill You Might Not Know About
You may have read my last post about fixing common issues that impact Dashlane’s autofill, but there’s actually more to the story. Now that you’ve got your autofill up and running smoothly, take it to the next level with these tips and tricks for optimizing and customizing how your autofill works.
If you want more options...
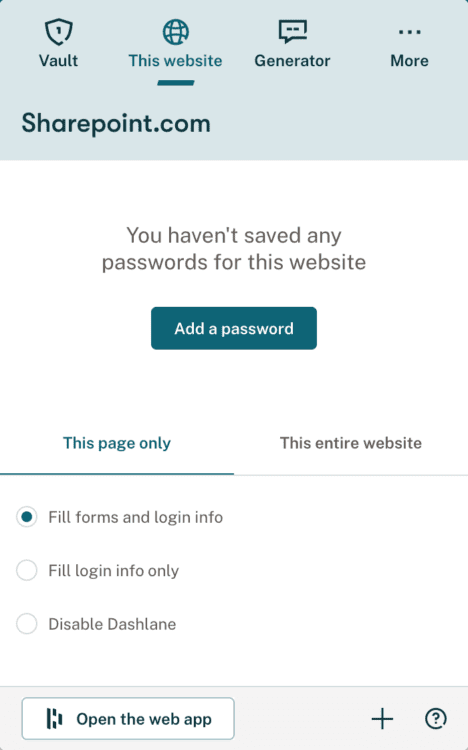
On some websites, you might want Dashlane to only fill your password and not personal info, or even to not have Dashlane autofill at all.
You can set those website-specific options right from your extension popup.
Open your extension, click on the This website tab, and choose from the options at the bottom of the window. You can also toggle between This page only and This entire website to apply your settings. We are currently improving this tab interface to make it even nicer, so stay tuned!
...or you have too many choices
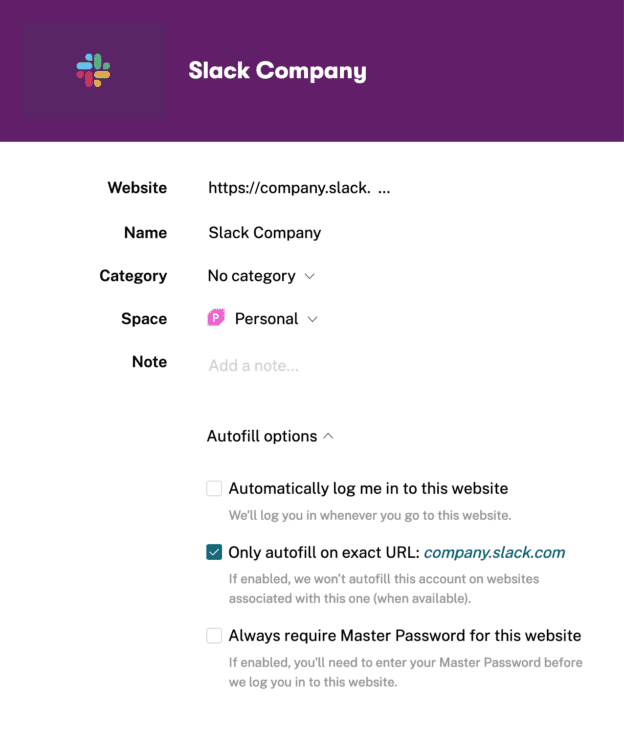
If you have multiple logins for the same service—for example, you have Slack accounts for both your work and personal emails, or for different companies—you might want to take advantage of Dashlane’s Only autofill on exact URL option.
Let’s keep going with the Slack example. Say you have logins for company.slack.com and organization.slack.com. Because the base domain (slack.com) is the same for both, Dashlane will suggest both credentials to you when you log in, regardless of whether you’re on company.slack.com or organization.slack.com.
If having to choose between the logins every time interrupts your workflow, or you find yourself often accidentally clicking the wrong one, you can use the Only autofill on exact URL option to tell Dashlane to only suggest a specific credential on that exact URL.
If autofill gets ahead of itself...
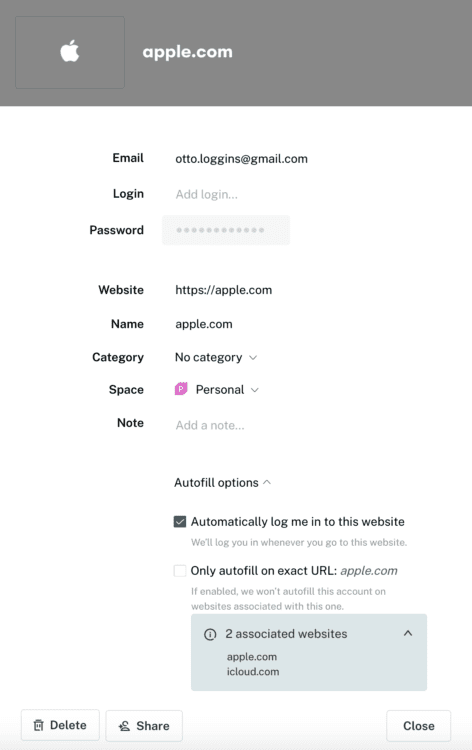
By default, Dashlane tries to automatically log you in when you visit a website. This means that not only does Dashlane fill in your username and password, but it also “clicks” the login button for you, saving you time.
But that's maybe not what you want—you do you. You can adjust this behavior at the password level to deactivate the auto-login. Here’s how:
- Open the credential in the web app
- Scroll down until you see Autofill options
- Uncheck Automatically log me in to this website
(You can reference the above screenshot to see these settings in context.)
When deactivated, we'll still suggest your credentials to you in a pop up, but you'll have to choose it manually and click the login yourself.
...or is a little behind
If you’ve ever been frustrated that two websites with identical credentials have to be stored separately in Dashlane, you’ll love this update that went live early this year.
We call two (or more) sites using the same login, like apple.com and icloud.com, “associated” websites. Sometimes it’s simple and obvious (like amazon.com and amazon.ca), but consider the whole extended Microsoft family, which uses the same account for everything from Outlook to Skype to Xbox.
Before, you would have to store all these logins separately. Now, you can just store the credential once and it should work across the other associated sites!
Dashlane maintains our own list of known associated websites that are automatically applied to autofill, but you can also suggest more sites here if you notice your autofill not working as it should.
Later this year, we'll allow you to manually add multiple URL to a single credential so you won’t even have to wait for our list to be updated.
Hopefully you feel like you’re now an autofill expert. And if you want to become even more of an expert on all things Dashlane, check out our open roles!
Sign up to receive news and updates about Dashlane
